Let's Make an App (Part 1)
- Skylar Castator

- Oct 16, 2023
- 5 min read
Part 1 of a multiple post series producing an application. Most of these posts will be behind the current production of the application but will share include more details and edits as I progress through the process.
Introduction
Lets face it, everyone has an idea for an app. Its usually a problem we have in our everyday life that we thought: "Why isn't there an app that does this?". The answer usually is, there is an app the does it, but probably not to the expectation of what you want. So after downloading a few samples you can identify what you like and dislike about each application that your million dollar idea is trying to accomplish. That's when you come up with a full roadmap of every feature that keeps expanding the scope of the application until its a multi-year project.

This is the first mistake that many people fall into. Sometimes called analysis paralysis it becomes such a large idea its hard to accomplish and figure out where to start. One of my previous bosses had a good philosophy for developing software.
Make it work
Make it work well
Make it pretty
So lets start off with a basic idea and then expand on it.
When I develop tools, I just want to make things that make my life easier or to give me a bit of a better management system for my interests. One thing I had an idea I had for myself was to make a Philosophy and Quote management system. I'm a avid reader and also have a love to memorize and use quotes in life.
Quotation is a susceptible substitution for wit. -Oscar Wilde
Make it work (Showing Quotes)
The first thing I wanted to develop was a basic display to show a quote and the author of the quote while also being able to see more than one quote. I talked to a friend who wanted something similar which would be a affirmations display on a raspberry pi with a small touch screen.

This code was stupid simple. I'll post it anyways but it was a pretext before building an application.
from PIL import Image
import random
from PyQt5.QtGui import *
from PyQt5.QtWidgets import *
from PyQt5.QtCore import *
import sys
import keyboard

class MainWindow(QMainWindow):
    def __init__(self):
        super().__init__()

        self.centralwidget = QWidget()
        self.setCentralWidget(self.centralwidget)
        self.label = QLabel("<h1>Hello, World!</h1>", parent=self.centralwidget)
        self.label.setSizePolicy(QSizePolicy.Expanding, QSizePolicy.Expanding)
        self.label.setAlignment(Qt.AlignCenter)
        self.label.setStyleSheet("QLabel {color: white;}")
        lay = QHBoxLayout(self.centralwidget)
        lay.addWidget(self.label)

        self.change_text()

    def keyPressEvent(self, event):
        if event.key() == Qt.Key_Space:
            self.change_text()

    def change_background(self, image_path):
        pass
        #img = ImageTk.PhotoImage(Image.open(image_path))
        #panel = tk.Label(self.window, image=img)
        #panel.pack(side="bottom", fill="both", expand="yes")
        #self.window.mainloop()

    def change_text(self):
        affirmation_instance = AffirmationManager()
        affirmation = affirmation_instance.choose_random_affirmation()
        # self.change_background(path)
        self.label.setText(f"<h1>{affirmation}</h1>")

class AffirmationManager:
    def __init__(self):
        self.affirmations_list = [
            "I am in the right place at the right time, doing the right thing.",
            "Conscious breathing is my anchor",
            "You are loved just for being who you are, just for existing.",
            "The chance to love and be loved exists no matter where you are.",
            "Courage starts with showing up and letting ourselves be seen",
            "Make way for the unprecedented and watch your reality rearrange itself.",
            "Open your heart and drink in the glorious day.",
            "Am I good enough? Yes I am.",
            "The perfect moment is this one.",
            "I am deliberate and afraid of nothing."
        ]

    def choose_random_affirmation(self):
        affirmation_num = random.randint(0, len(self.affirmations_list) - 1)
        return self.affirmations_list[affirmation_num]


stylesheet = """
    MainWindow {
        background-image: url("./backgrounds/meditation_1.png");
        background-repeat: no-repeat;
        background-position: center;
    }
"""

if __name__ == "__main__":
    app = QApplication([])
    app.setStyleSheet(stylesheet)
    window = MainWindow()
    window.setWindowTitle("Affirmations")
    window.setGeometry(100, 100, 1024, 600)
    window.show()
    sys.exit(app.exec())
Now just from this, I felt like I was missing quite a bit. I want to build an app not just and python script... So one thing I just defaulted to was building something similar inside of Unity.
Moving it to Unity
If you haven't used Unity before, its a 3d game engine that allows you to build cross platform to multiple mobile devices. I have a lot of experience in Unity so felt like it would be a good into back into mobile development or for video games.
So the first thing I setup was a basic UI. I included a basic header, menu button and drop down and finally the a placeholder for the quote and author.
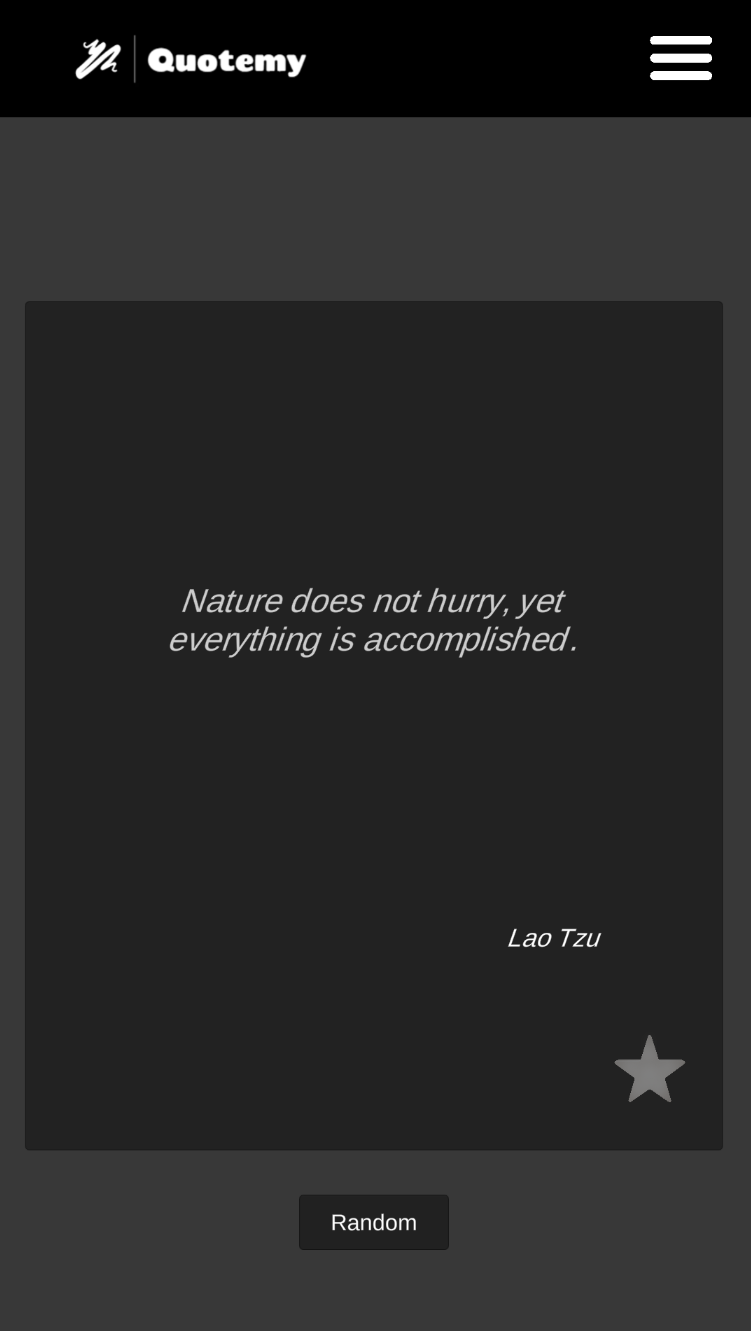
The quotes unlike the demonstration above I wanted to get from a database and not just a list that was in the memory of the device running the application. This makes the system scalable and easier to update or resolve bugs once the application gets into production. So the first process was having to make serializable classes for most of the data I wanted to maintain on the servers. This is the example for Quotes:
using System.Collections;
using System;
using System.IO;
using System.Collections.Generic;
using UnityEngine;
using MongoDB.Bson;

[System.Serializable]
public class Quote
{
    public ObjectId _id { set; get; }

    public string guid { set; get; }
    public string quote { set; get; }
    public string authorName { set; get; }
    public string history { set; get; }
    public string summary { set; get; }
    public string[] tags { set; get; }

    public Quote(string _guid, string _quote, string _authorName, string _history, string _summary, string[] _tags)
    {
        guid = _guid;
        quote = _quote;
        authorName = _authorName;
        history = _history;
        summary = _summary;
        tags = _tags;
    }
}
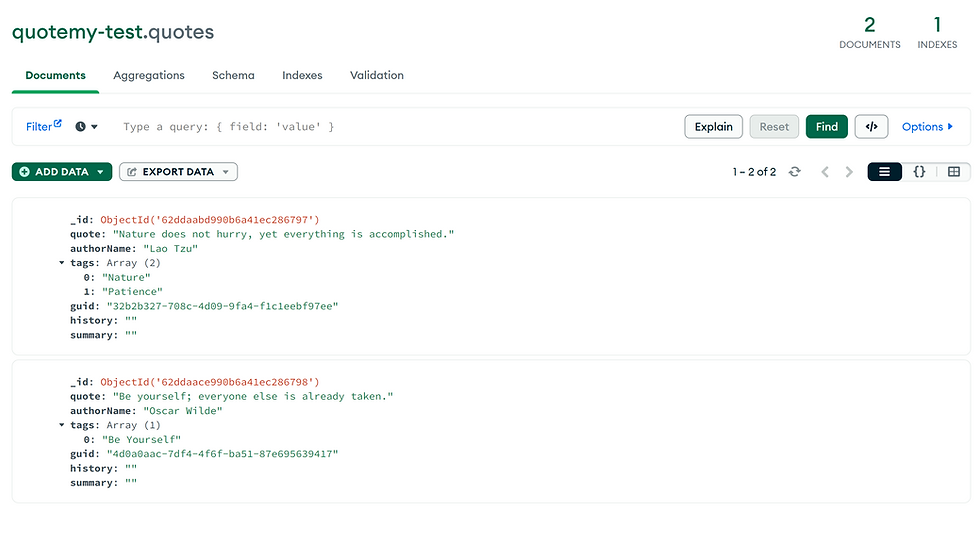
These serializable classes are great for being able to use JSON and databases online. The database I choose to setup was for MongoDB. MongoDB is NoSQL and is a non-relational database. I first started including basic documents inside of the database to be able to start writing code to GET and POST data for future quotes and getting the application more setup over time.
Linking MongoDB
*WARNING*
This library does not work on mobile device builds. This works well to get your data up and running with minimum requirements, but I had to go back in and make an API to call this database later.
Now I have some data that I can pull I needed to actually access the MongoDB database and start getting the information for the application. I found this plugin for accessing MongoDB and just went for it.
https://github.com/Julian23517/Unity-mongo-csharp-driver-dlls
The example code to start getting the database linked up is below:
using MongoDB.Driver;

private const string MONGO_URI = "mongodb://username:password@127.0.0.1:27017";
private const string DATABASE_NAME = "quotemy-test";
private MongoClient client;
private IMongoDatabase db;

client = new MongoClient(MONGO_URI);
db = client.GetDatabase(DATABASE_NAME);
Once you have access to the database you need to be able to do a GET call for the collections of quotes. Because we already have a serializable class we get that data using this simple function call.
IMongoCollection<Quote> quoteCollection = db.GetCollection<Quote>("quotes");

List<Quote> quoteList = quoteCollection.Find(user => true).ToList();
This was the basic idea between the communication between the app and database. This was more of a test and to make it "work". We later move everything into a proper API but just to get the data structures in place it was a good example to start getting things linked up.
Other database collections I started to include was for authors, tags, and user account data. The next big step after setting up the serializable classes is starting to fill in the database as well as creating UI / UX interfaces inside of the application to display this data.
Conclusion
This is was the first big steps in building the application. Its a long way from being done, but this tutorial is to help break up step by step the big concepts for how to make a publishable application for yourself. What this initial tutorial shows is no matter what the concept is for your project, once you start trying to make something that can go out to the public, it takes a lot more effort. Start by building something small. Prove the concept and then start to scale the project.